Elevate Your CI/CD: Dockerized E2E Tests with GitHub Actions
End-to-end testing is a critical aspect of software development that tests a workflow from start to finish, guaranteeing that the system and its components function together as expected. This article details the process of setting up a GitHub Actions pipeline for end-to-end testing an Express and React app by spinning up a local environment using Docker Compose, and executing dockerized Playwright tests against that local environment.
Explore the sample repository on Github: Docker Express React Sample Repo
1. Project Overview
Our setup consists of five key components:
- An Express-powered Node.js backend.
- A frontend built on the React framework.
- Docker Compose for initializing the local environment.
- Playwright for performing E2E testing.
- GitHub Actions for conducting automated Continuous Integration (CI) tests.
2. Dockerization of Express and React Applications
The first step involves creating Dockerfiles for both the Express and React applications. Each Dockerfile contains necessary instructions to build a Docker image for its respective application.
2a. Express App Dockerfile
This Dockerfile begins from a base Node.js image, copies application files into the container, installs dependencies using Yarn, compiles the application, and lastly, specifies the command to launch the Express app.
# Specifies the base image from Docker Hub. We're using the official Node.js image at version 16.15.
FROM node:16.15

# Sets the working directory in the container to /app. All following instructions operate within this directory.
WORKDIR /app

# Copies package.json and yarn.lock from your current directory (host machine) to the present location (inside the container) to manage dependencies.
COPY package.json yarn.lock ./

# Installs all the dependencies as specified by the lock file. The `--frozen-lockfile` option ensures that Yarn throws an error if the yarn.lock file is not up to date with the package.json file.
RUN yarn install --frozen-lockfile

# Copies the rest of your application code from the current directory (host machine) to the present location inside the container.
COPY . .

# Compiles the application.
RUN yarn build

# Specifies the command to start the express app. We're running the built application using Node.js directly instead of using Yarn or Nodemon to avoid issues with signal handling.
CMD ["node", "dist/index.js"]
2b. React App Dockerfile
The Dockerfile for the React application is similar to the Express Dockerfile, with the key difference being the start command. Since React apps compile into static files served by a web server, they lack a Node.js entry point like Express apps. Hence, ‘yarn start’ is used as the start command to trigger Create React App’s development server.
# Specifies the base image from Docker Hub. We're using the official Node.js image at version 16.15.
FROM node:16.15

# Sets the working directory in the container to /app.
WORKDIR /app

# Copies package.json and yarn.lock from your current directory (host machine) to the present location (inside the container) to manage dependencies.
COPY package.json yarn.lock ./

# Installs all the dependencies as specified by the lock file.
RUN yarn install --frozen-lockfile

# Copies the rest of your application code from your current directory (host machine) to the present location inside the container.
COPY . .

# Compiles the application.
RUN yarn build

# Specifies the command to start the React app using 'yarn start', which starts a development server with features such as live reloading, suitable for the testing environment.
CMD ["yarn", "start"]
3. Setting Up Local Environment with Docker Compose
We use Docker Compose to spin up a local environment that consists of both the Express and React apps. We define a docker-compose.yaml file, where we describe the services (Express and React apps) to be created, including the custom container names, build context directories, Dockerfile locations, and port mappings.
# Specifies the version of the Docker Compose file format. This is version 3.
version: "3"

# Describes the services to be created.
services:
  # Defines the first service, express-app.
  express-app:
    # Sets a custom container name. This is useful for easy identification of running containers.
    container_name: express-app
    # Specifies the build context directory and Dockerfile location.
    build:
      context: ./express-app # Replace with the path to your express app
    # Maps port 5000 of the container to port 5000 on the host machine.
    ports:
      - 5000:5000 # Replace with the port your express app runs on

  # Defines the second service, react-app.
  react-app:
    # Sets a custom container name.
    container_name: react-app
    # Specifies the build context directory and Dockerfile location.
    build:
      context: ./react-app # Replace with the path to your react app
    # Maps port 3000 of the container to port 3000 on the host machine.
    ports:
      - 3000:3000 # Replace with the port your react app runs on
4. Configuring Playwright for E2E Testing
Next, we dockerize our Playwright tests. The Dockerfile will start with Node.js and Playwright images, copy the test files into the container, install the necessary dependencies, and install system dependencies and the Playwright CLI. This setup assumes that the Dockerfile, Playwright config file, and the tests are all within the same directory.
# Use the "node:16.15" and "mcr.microsoft.com/playwright:focal" images as base images.
FROM node:16.15
FROM mcr.microsoft.com/playwright:focal

# Set the working directory inside the container.
WORKDIR /app

# Copy "package.json" and "yarn.lock" from the current directory to the working directory inside the container.
COPY package.json yarn.lock ./

# Install the dependencies listed in "package.json" and "yarn.lock".
RUN yarn install --frozen-lockfile

# Install the system dependencies needed by Playwright.
RUN npx playwright install-deps

# Install the Playwright CLI.
RUN npx playwright install

# Copy everything from the current directory to the working directory inside the container.
COPY . .
The Playwright configuration file playwright.config.ts configures the testing environment, including execution settings (like timeout, retries, workers), the viewport size, video recording, and the base URL for testing.
// Import necessary modules and the "devices" definition from Playwright.
import { PlaywrightTestConfig, devices } from "@playwright/test";

// Check if this script is running in a Continuous Integration (CI) environment.
const isCI = Boolean(process.env.CI);

// Define the configuration for Playwright Test.
const config: PlaywrightTestConfig = {
  // In a CI environment, prevent test files or suites that are exclusively specified with ".only".
  forbidOnly: isCI,
  // In a CI environment, retry failed tests once. Otherwise, don't retry failed tests.
  retries: isCI ? 1 : 0,
  // Allow multiple workers to run tests at the same time.
  fullyParallel: true,
  // Use three workers to run tests.
  workers: 3,
  // Limit the execution time of each test to 60s.
  timeout: 60000,
  // Set the configuration used by every test.
  use: {
    // In a CI environment, run tests in headless mode. Otherwise, show the browser UI.
    headless: isCI,
    // The base URL used by page.goto().
    baseURL: "http://localhost:3000",
    // The viewport size for each page.
    viewport: { width: 1920, height: 1080 },
    // Record video for each test.
    video: {
      mode: "on",
      size: { width: 1920, height: 1080 },
    },
  },
  // The directory containing test files.
  testDir: "./src",
  // The directory to write test result files.
  outputDir: "e2e-test-results/",
  // The pattern to find test files.
  testMatch: ["*.test.ts"],
  // The reporters used to generate test results.
  reporter: [
    ["list"],
    ["html", { open: "never", outputFolder: "e2e-report" }],
    ["junit", { outputFile: "e2e-report/results.xml" }],
  ],
  // The browsers to run tests.
  projects: [
    {
      name: "chromium",
      // Use the pre-configured device descriptor for "Desktop Chrome".
      use: { ...devices["Desktop Chrome"] },
    },
  ],
};

// Export the configuration for use by Playwright Test.
export default config;
5. Implementing the GitHub Actions Pipeline
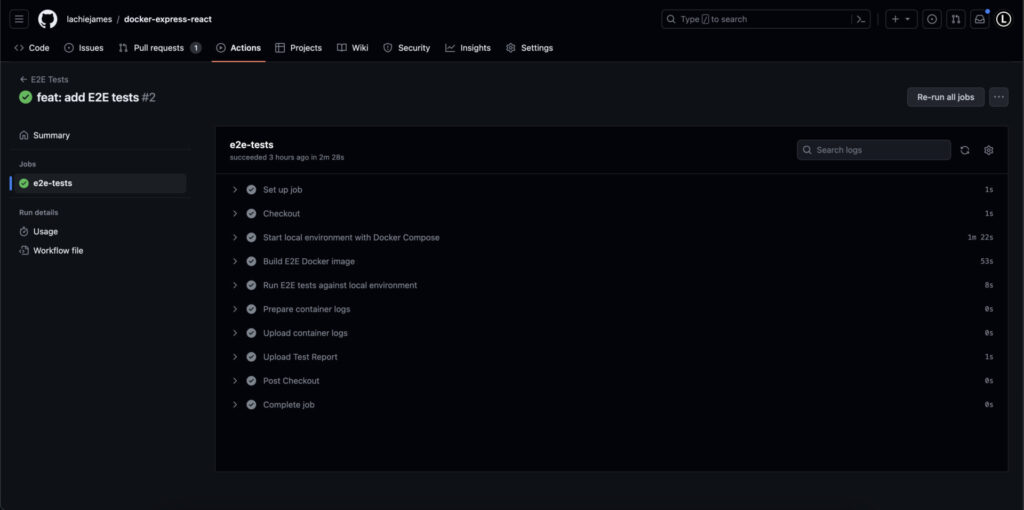
The final step involves setting up a GitHub Actions pipeline. Defined in .github/workflows/e2e-tests.yml, the pipeline is triggered every time a pull request is made to the ‘main’ branch or when manually instigated. The pipeline checks out the repository, launches the local environment with Docker Compose, builds the Docker image for E2E tests, executes the tests against the local environment, and finally, uploads the container logs, test reports, and video recordings as artifacts.
# Define the name of the workflow.
name: E2E Tests

# Define the events that trigger the workflow.
on:
  # Run the workflow when a pull request is made to the "main" branch.
  pull_request:
    branches: [main]
  # Allow running the workflow manually from the GitHub Actions tab.
  workflow_dispatch:

# Define the jobs in this workflow.
jobs:
  e2e-tests:
    # Run this job on the latest Ubuntu (Linux) runner hosted by GitHub.
    runs-on: ubuntu-latest
    # Limit the execution time of this job to 15 minutes.
    timeout-minutes: 15
    # Define the steps in this job.
    steps:
      # Checkout the this repository.
      - name: Checkout
        uses: actions/checkout@v3

      # Build and start the "express-app" and "react-app" containers in detached mode to avoid blocking the workflow.
      - name: Start local environment with Docker Compose
        run: docker compose up -d

      # Build the Docker image for E2E tests.
      - name: Build E2E Docker image
        working-directory: e2e
        run: docker build -t playwright-tests .

      # Execute the E2E tests
      - name: Run E2E tests against local environment
        working-directory: e2e
        run: docker run -v $(pwd)/e2e-report:/app/e2e-report --name playwright-tests --network=host playwright-tests yarn e2etest:ci

      # Prepare the logs for all containers.
      - name: Prepare container logs
        if: always() # Ensure logs are captured, even if the tests fail.
        run: |
          # Create the "logs" directory
          mkdir -p logs

          # Export each Docker container's logs to files in the "logs" directory.
          docker logs express-app >& logs/express-app.log
          docker logs react-app >& logs/react-app.log
          docker logs playwright-tests >& logs/playwright-tests.log

      # Upload the logs for all containers as an artifact.
      - name: Upload container logs
        if: always() # Ensure logs are captured, even if the tests fail.
        uses: actions/upload-artifact@v2
        with:
          name: E2E Logs
          path: logs

      # Upload the test report and video recordings as an artifact.
      - name: Upload Test Report
        if: always() # Ensure test report is captured, even if the tests fail.
        uses: actions/upload-artifact@v2
        with:
          name: E2E Test Report
          path: e2e/e2e-report
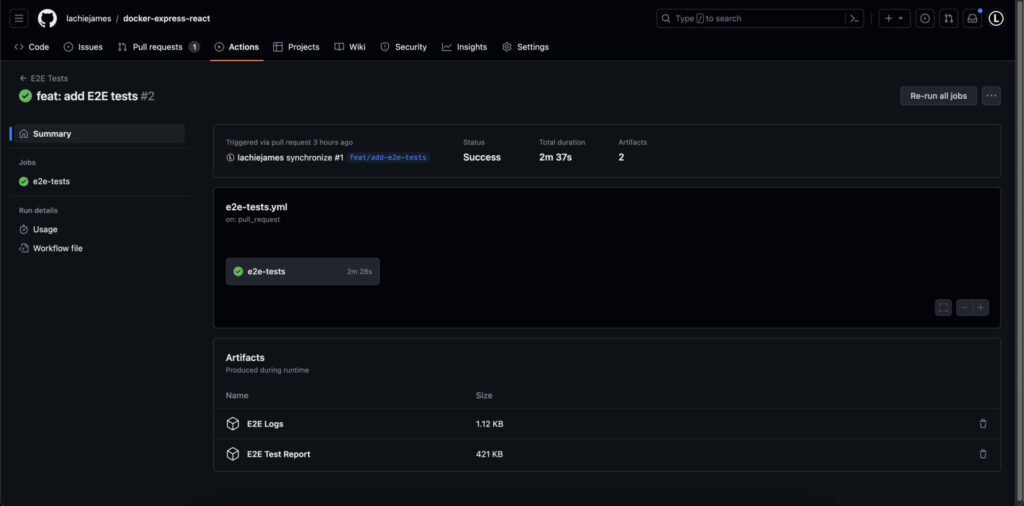
Now create a pull request against the main branch to execute your E2E Test pipeline.

Once complete, navigate to the summary tab to download your pipeline artifacts, including:
- Logs for the backend, frontend, and e2e containers
- The E2E Test report, which includes video recordings for each test

Now, you’re set to automatically test your applications end-to-end whenever necessary, ensuring that your system functions as expected in a production-like environment. This workflow will help you catch bugs and issues early before they reach your users.